Welcome to the NewsReady32 Manual
| NewsReady32 lets you receive, edit, and store hundreds of wire news stories an hour from more than 100 sources – then build custom newscasts quickly and easily. This guide makes it easy to get started, and it will serve as a valuable reference tool for as long as you own NewsReady32. The guide provides detailed, yet easy-to-read, information and tutorial on such topics as:
Introduction In their simplicity, they made use of function- or hotkeys, that once memorized would instantly take users to the screens in which they needed to come and go. News people could work at great speed and seemingly never look up from their keyboards. Then came Windows, which revolutionized personal computing. Among other improvements, Windows brought greater flexibility with respect to moving through a program (or navigating) and executing commands. Pulldown menus made it possible to locate and choose any and all program options with something called a "mouse," and almost never have to hit a key. But sometimes newer is not necessarily better. While pulldown menus made commands and options easy to find and eliminated any need to memorize key combinations, the process was generally slower. Fortunately, Windows soon added keyboard equivalents to mouse commands. Hotkeys were added, as were the "F" (for function) keys, which make up the top row of today’s keyboards. These additions meant that users didn’t need to keep their eyes glued to the monitor. With the superior graphical interfaces of Windows 95, 98, and NT, toolbar buttons gave users yet another option for navigating and executing commands. And for saving time. Similarly, multitasking made it possible to work within several – even many – different windows at the same time. For news radio professionals, this meant they could simultaneously work on their own stories, read wire service copy, and review someone else’s copy. They could even move in and out of each with a simple click or keystroke. The good news, then, is that later versions of Windows brought added flexibility that freed users from certain time-consuming constraints imposed by early mouse-exclusivity. The not-so-good news is that Windows programs do not necessarily take advantage of this flexibility. Many require users to constantly use the mouse to grab pulldown menus and click on selections. You may already know from experience that this can quickly become tedious.
NewsReady32 is a standard 32-bit Windows program that retains speedy keyboard-based navigation from DOS systems and takes advantage of modern user-friendly OS features. NewsReady32 lets you navigate, make selections, and execute commands…
NewsReady32 consists of five screens:
Windows programs allow users to open an unlimited number of windows, or screens, in which to work. Being able to run multiple notepads, or stories in progress, means that users don’t have to finish and save one story before starting on another. Similarly, with several WireBrowsers open at the same time, one could be auto-updating on sports while another updates on urgents. While NewsReady32 supports this environment in its Standard mode*, it also offers users the choice of Classic mode, which is more consistent with the systems to which most news radio professionals have grown accustomed over the last two decades. Classic mode enables NewsReady32 to operate with one screen open for each function, i.e., one Notepad, one Planner, one File Log, one AudioLog and one WireBrowser, for optimal speed and organization. Classic mode brings together Windows functionality and the time savings and simplicity of legacy newsroom systems. There is no fear of getting lost or being overwhelmed by inadvertently opening too many redundant windows. Also, in Classic mode windows are automatically sized for full- and half-screen viewing. For example, hitting the F7 key will launch Notepad, and it will appear full screen. Hitting F8 (while in Notepad) will create an equally divided screen that displays both the WireBrowser and Notepad. This "locked" feature prevents the accidental dragging of windows off the screen, as well as the incorrect sizing of windows. With Classic mode, WireReady has effectively given this 32-bit Windows program the same look and feel of our original and very popular DOS version – which remains an integral part of more than 2,000 radio newsrooms. Note: Classic Mode supports two administrator-configurable ini settings, which can be set for horizontal or vertical splits. It can be set to allow anywhere from one to an unlimited number of NotePads. Dual Screen Mode has the same characteristics of Classic Mode, except that it displays two of every screen.
* Standard mode and Dual Screen mode are discussed in greater detail at the end of this guide. Getting started
Double click (left mouse button, unless otherwise specified) the NewsReady32 icon on your Windows 95/98 desktop. When prompted, enter your user name and hit ENTER. At the main screen, double click the NewsReady32 button found in the upper left Portion of the screen. (The main screen contains the WireBrowser, Notepad, Audio Player, and Audio Log.)
Navigating
Moving through the program (or navigating) and performing tasks can be accomplished in several ways. You can use the keyboard, the mouse, or the onscreen toolbar (utilizing the mouse). There is no right or wrong way; we’ve designed NewsReady32 with convenience and ease of use in mind. Whichever option you’re most comfortable with is the "right" way. Many users find that some combination – the keyboard for certain functions and the mouse for others – allows them to work most quickly and efficiently.
WireBrowser
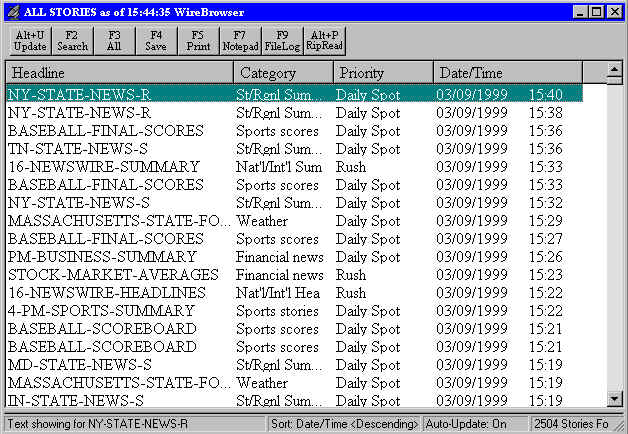
Your source for building custom newscasts The WireBrowser is the activity hub of NewsReady32. This is where wire stories arrive – often a hundred or more in an hour – and are displayed in chronological order, with most recent arrivals listed first. WireBrowser shows each story’s headline, category, priority, and date and time. It is within this application that you view, select/copy, print, sort, and save wire stories. Before actually editing wire copy and inserting it into a newscast, let’s first get to know WireBrowser. The toolbar, located near the top of the screen, displays WireBrowser’s primary functions. Looking from left to right, the first toolbar button you’ll see is Update. This feature manually updates WireBrowser to display the most recent arrivals. WireBrowser is programmed to update automatically, but the manual feature allows you to get updates whenever needed.
KEYBOARD Hold down ALT and hit U
MOUSE Click Update in the toolbar Select Update from the File pulldown menu
Skipping over one button on the toolbar, we find All (for All Stories). People tend to think of Update and All Stories (formerly Show All) together, but they serve very different purposes. Activating All Stories shows all stories in WireBrowser, but does not update them. Use All Stories anytime you wish to return to the complete list of stories. KEYBOARD Hit F3
MOUSE Click All in the toolbar Select All Stories from the File pulldown menu Sorting wire copy NewsReady32 gives you the ability to view and arrange wire stories by headline (alphabetically), category (national news, sports, etc.), priority (rush, urgent, etc.), or date and time. To sort your wire copy, you’ll need to reach for your mouse (there is no keyboard option) and click the heading (just below the toolbar) you wish to sort by. Sorting will remain this way until you change it.
Searching wire copy
NewsReady32 offers powerful and easy-to-use searching capabilities that include pre-built searches that can be edited or deleted, plus the flexibility to create your own custom searches. Each user can have his or her own set of searches.
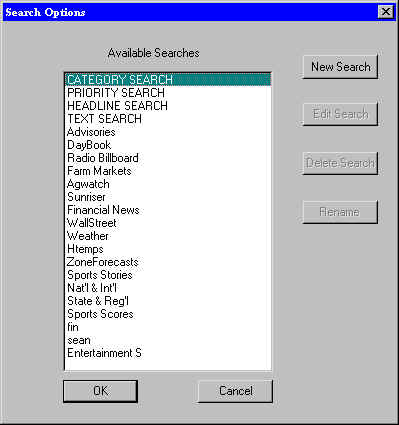
The ‘F2 search’ Within WireBrowser, use your mouse to click F2 Search on the toolbar (or select Search
from the File puldown menu), or hit F2 on your keyboard. This will display a list
of your current searches. Double-click the heading of the search you wish to perform, or single-click to highlight the heading and click OK. The stories currently in WireBrowser that meet that search's requirements will be displayed. To return to a display of all stories, click F3 All on the toolbar (or select All Stories from the File pulldown menu), or hit F3 on the keyboard.
Category, Priority, Headline, and Text searches These general searches are the first four on your list. (These cannot be deleted.) When you select Category Search, you will see a list of all the categories (national news, sports, etc.) a story can have (as displayed on your browser). Choose the category you are looking for by double-clicking it, or by single-clicking to highlight it and clicking OK. With the keyboard, use the ARROW keys to scroll and highlight your desired category, then hit ENTER. This will display the a list of stories with the category you have chosen.
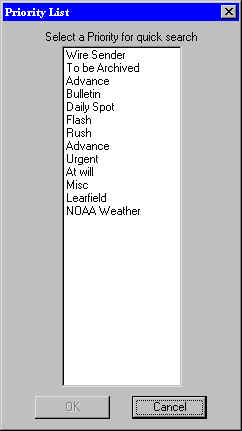
Priority search This feature displays a list of all the priorities (rush, urgent, etc.)a story can have. Choose the priority you are looking for double-clicking it, or by single-clicking to highlight it and clicking OK. With the keyboard, use the ARROW keys to scroll and highlight your desired priority, then hit ENTER. You will see a list of stories with the priority you have chosen
NOTE: Categories and Priorities differ from wire service to wire service. The examples we used above may not be an option, depending what wire service you have.
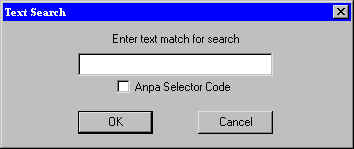
Headline search This option lets you search headlines as they appear in WireBrowser. For example, to search for headlines containing the word Clinton, then you would type Clinton and click OK or hit ENTER. This will display all stories that have the word Clinton somewhere within the headline.
Text search This is similar to headline search, except that it will look for one or more words from the headline/priority and body of the story. For example, to search for stories containing the phrase Clinton scandal, then you would type Clinton scandal and click OK or hit ENTER. This will display all stories that have the phrase Clinton scandal somewhere in the story.
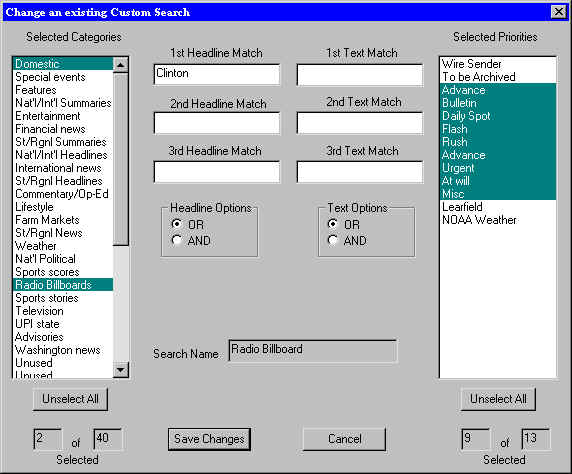
Creating new searches Users can create their own custom searches. From WireBrowser use your mouse to click F2 Search on the toolbar (or select Search from the File puldown menu), or hit F2 on your keyboard. This will display a list of your current searches. Click New Search. You will see a box titled Add a new custom search. Use it to define which categories, priorities, headline or text matches you want to search within. To select categories or priorities, highlight the categories by single-clicking each category or priority you want to be searched. In the text box, enter the phrases or keywords you are looking for. If you want to find stories from a particular date range, enter the desired dates in the stop and start date fields. When finished, enter a name for this search. By default it will say Untitled Search. Replace this with your own search name (in the search name field). The name will then appear on your list of searches when you select F2 Search from WireBrowser.
Printing wire copy We’ll examine printing in greater detail later in this guide, but by this point many of you may want to know how to quickly print all or portions of a wire story.
From WireBrowser, highlight a headline and choose from the following options:
KEYBOARD Hit F5 Hold down the CONTROL key and hit P
MOUSE Click Print in the toolbar Select Print from the File pulldown menu You’ll see a print dialogue box that will guide you through several printing options, including full story, individual pages or a range of pages, or print selection, which lets you print only that text you previously highlighted.
QuickView This convenient feature of WireBrowser lets you divide the screen horizontally and view headlines, categories, etc. in the upper window. As you scroll up or down, individual headlines are selected or highlighted in the upper window, and the story that corresponds to each headline appears in the lower window. Depending on its length, you may be able to view a particular story in its entirety in the lower window. But even if it runs longer, you can see it all by scrolling down, with either the keyboard’s ARROW keys or with your mouse. To open QuickView (from WireBrowser), use your mouse to move the cursor toward the bottom of the WireBrowser window. As you descend just below the last viewable headline, the cursor will become a double-pointed vertical arrow. When it does, hold down the left mouse button and drag the gray window divider bar to any position you wish. To close QuickView, drag the divider bar back to the bottom of the screen
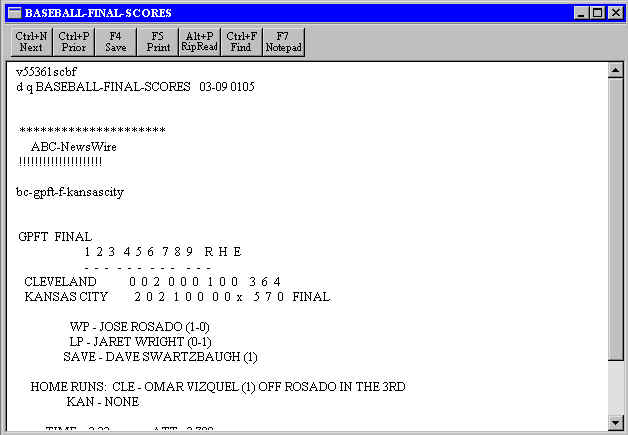
Pop Viewer You can also open a wire story directly into an editor by double-clicking its headline or by highlighting the headline and hitting the ENTER key. When the story is opened in the Pop Viewer, you can edit/print, or copy and paste all or portions of it into Notepad. Within Pop Viewer, you can use the F11 and F12 keys to jump to the next or previous story in the list. This allows you to browse wire stories and select the ones you want as you go. Hitting the ESC key will return you to WireBrowser.
Copying and Pasting Wire Copy WireBrowser, in combination with Notepad, makes it easy to move copy out of a wire story and into your customized newscast. We just saw how headlines are highlighted as you scroll up and down. Similarly, you can highlight any portion of wire copy – from one word to the entire story – and "paste" it into your newscast. The first step is to select the story you want to use. If you want to use QuickView, you can get into the lower or text window by placing the cursor inside it and clicking your mouse. Or you can open the story in the Pop Viewer by double-clicking its headline or by highlighting the headline and hitting the ENTER key. Next, you’ll highlight or select the text you wish to use: Place the cursor, using your mouse or ARROW keys, at the beginning of the text you want to copy. With your mouse, hold down the left button and move the cursor to the end of the desired text. Or, using the keyboard, hold down the SHIFT key and use the ARROW keys to move the cursor to the end of the desired text. (For very long copy, you can hit the PAGE DOWN key while holding down SHIFT.) You can release the mouse button or keys; the text will remain highlighted until you move the cursor. Now copy the selected text: RECOMMENDED
OPTIONALLY You can achieve the same results by
You can also access the pulldown menus with the keyboard. Hold down the ALT key and hit the underscored letter of the menu you wish to open, then follow the same procedure for selecting commands. _________________________________________________________________________ AutoPurge
It’s reasonable ask – since wire stories are constantly being received by the WireBrowser – if the system ever becomes overloaded. A feature called AutoPurge, as the name suggests, automatically deletes wire stories (oldest first) when a set cache or database size is reached. Your systems administrator sets the size. For most radio stations, a 5-megabyte database will hold about two days’ worth of feeds. Now you are ready to move into the Notepad and use the selected and copied text to build your newscast.
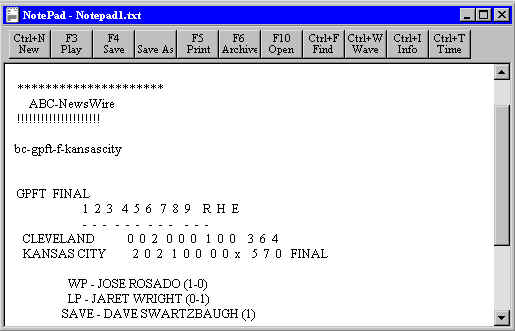
Notepad is NewsReady32’s word processing program. For ease of use and familiarity, Notepad employs most of the same commands and key combinations as commercial software such as Microsoft Word or WordPerfect. To open Notepad, hit F7, or hold down the ALT key and hit the 1 key. Using the mouse, click on Notepad in the toolbar near the top of the screen, or select Notepad from the Programs pulldown menu at the very top. Once inside Notepad window, use the mouse or ARROW keys to position the cursor where you want the copied text to appear, then paste the text:
The text that you copied from the story in the WireBrowser should now be visible in Notepad. It is fully editable, so you can add, remove, and rearrange words and sentences.
SplitScreen
Options for even faster copying and pasting
We’ve seen how copying and pasting works, and how it can save time by eliminating the need to retype copy. But the process we used to illustrate this task, while an effective way for newcomers to become familiar with NewsReady32, may not be fast enough for real-world needs. That’s where SplitScreen comes in. When we walked through the initial copy-and-paste exercise, remember that we worked exclusively inside WireBrowser for selecting and copying, then we exited WireBrowser and opened Notepad for positioning and pasting. With SplitScreen, WireBrowser and Notepad can appear together on your screen. What we will see next is how working in these two applications simultaneously saves time. First, the extra time and keystrokes/mouseclicks that are required to move in and out of each screen is eliminated. (The same processes – key combinations, mouseclicks, and toolbar selections – we discussed for copying and pasting can be used within SplitScreen.) Second, SplitScreen lets you take advantage of drag and drop and Rip & Read. To engage SplitScreen, hit the F8 key. If WireBrowser is open, you’ll see headlines in the upper window, and a blank Notepad screen in the lower window. Note: within SplitScreen, the simplest way to move between windows is hit F7. This normally opens Notepad, but within SplitScreen (once Notepad has been opened). You can also mouse-click inside your window of choice. With this configuration, you’re ready to perform a Rip & Read, which lets you use a headline to copy up to three entire stories to the Notepad :
It’s important to remember that Rip & Read copies and pastes entire stories. You can, of course, cut and otherwise edit copy once it is pasted in Notepad. Also, if you have several Notepads open, you will be asked which is have the text inserted.
Drag and Drop Using the mouse, you can physically move as much or as little text as you wish from one window to the other. To drag and drop, go to SplitScreen with headlines displayed in the upper (WireBrowser) window and a blank Notepad window below, then
Find & Replace You can locate individual words in a story and even replace them automatically. To initiate Find, use your mouse to select Find from the Edit pulldown menu. With the keyboard, hold down the CONTROL key and hit F. A box will appear, asking you to enter the word you want to find.
For Replace, use your mouse to select Replace from the Edit pulldown menu. With the keyboard, hold down CONTROL and hit H. In the box that appears, enter both the word you’re seeking and the word you wish to replace it with. You can then take advantage of several convenient options.
Undo If you accidentally delete, insert, or copy something and really wish you hadn’t, or if you simply change your mind about the last action you took, hold down CONTROL and hit Z, or use your mouse to select Undo from the Edit pulldown menu.
Printing your completed story
From Notepad, you can choose from several options to print your story:
KEYBOARD Hit F5 Hold down the CONTROL key and hit P
MOUSE Click Print in the toolbar Select Print from the File pulldown menu
Printing wire copy
From WireBrowser, highlight a headline and choose from the following options:
KEYBOARD Hit F5 Hold down the CONTROL key and hit P
MOUSE Click Print in the toolbar Select Print from the File pulldown menu
From both Notepad and WireBrowser, you can print an entire story, selected pages, or only text that you highlight before executing a print command. To print selected text from a wire story, you’ll need to open the story within WireBrowser to find your desired text.
Saving your stories
With the story open (displayed in Notepad), you can save it by:
KEYBOARD Hitting F4 Holding down CONTROL and hitting S
MOUSE Clicking Save in the toolbar Selecting Save from the File pulldown menu
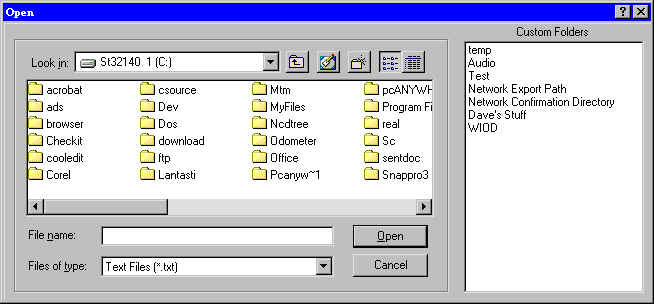
A dialogue box will appear and prompt you for a file name and other information, followed by the name of the custom folder in which you want the story saved. Your name and the date will be automatically entered, as will the story’s running time.
To retrieve a saved file
Open a new Notepad by hitting F7, or holding down the ALT key and hitting the 1 key. Using the mouse, click on Notepad in the toolbar near the top of the screen, or select Notepad from the Programs pulldown menu at the very top.
Within the new Notepad, select Open from the File pulldown menu, then double-click the desired filename. (Or type the filename in the text box and hit ENTER.)
Or with the keyboard, hold down ALT and hit the F key, the hold down CONTROL and hit O. Use the ARROW keys to find and highlight your desired filename, then hit ENTER – or type the filename in the text box and hit ENTER.
File Log After you’ve spent time and effort on a story, the last thing you want is to lose it in a "black hole," where at best you waste valuable time trying to hunt it down, and at worst it is never to be seen again.
With File Log, you can manage saved files in a variety of custom folders (a tree of sorts), including day folders, specific-show folders, phonebooks, and other information systems. (These can be set by your systems administrator.) Think of it as a modern update to old "tray" "or clipboard" filing system.
Stories are saved in chronological order, with the most recent going to the top of the list. For fast access, you can take advantage of a search feature similar to that in WireBrowser. To rework a story from the File Log, simply click the headline or use the ARROW keys to highlight a headline and hit ENTER. Then hit F8 to go to a split screen, and copy and paste quickly and easily.
NOTE: To switch folders at any time, click Select from the File Log toolbar or hold down CONTROL and hit L.
When you save stories to a custom folder, you can place them in any order and prioritize them any way you choose. To change the position of individual stories, click Rundown from the File Log toolbar, or hold down the ALT key and hit U. Highlight a headline with your mouse and click the + (plus) and – (minus) buttons on the toolbar. Or with the keyboard, use the ARROW keys to make your selection, then use the + (plus) and – (minus) keys to move it up or down. To return to the original order, simply reselect Rundown (toolbar or ALT+U).
To return to more detailed display (Rundown shows only a slug and time), click Rundown (toolbar or ALT+U), then Slug from the toolbar just above the top story.
You can copy and paste and transfer files between folders. To copy and paste an entire story from one folder to another:
Copying multiple stories. You can copy and paste several stories simultaneously by following the same procedure. But you must first make your multiple selections:
Select each desired headline by single clicking it while holding down the CONTROL key. With the keyboard, hold down the CONTROL key as you scroll with the ARROW keys, then hit the SPACEBAR to select a headline/story. (There is no limit to the number of selections you can make.) Now follow the remaining steps listed above for copying and pasting.
Deleting multiple stories. Likewise, you can save time removing files/stories by deleting several at a time. Follow the same steps listed for copying multiple stories. Again, there is no limit to the number of selections you can make. After selecting all the stories you wish to delete, hit the DELETE key. Or, using the mouse, select Delete from the Edit pulldown menu. A warning box will appear and ask if you’re sure you want to delete the selected files.
To copy and paste selected text from one folder to another:
Open the desired custom folder and story. Place the cursor, using your mouse or ARROW keys, at the beginning of the text you want to copy. With your mouse, hold down the left button and move the cursor to the end of the desired text. Or, using the keyboard, hold down the SHIFT key and use the ARROW keys to move the cursor to the end of the desired text. You can release the mouse button or keys; the text will remain highlighted until you move the cursor. Now copy the selected text by holding down the CONTROL key and hitting the C (letter) key. Or, using the mouse, select Copy from the Edit pulldown menu at the top of the screen. Now you can paste the text into an existing story or Notepad. NOTE: hitting F8 while in File Log will create a split screen with File Log and Notepad; in this setting you can also use your mouse to drag and drop (see previous detail) text from a File Log story into Notepad.
To view an updated list of stories at any time, click Refresh from the File Log toolbar or hold down CONTROL and hit R.
Archive
If File Log can be thought of as a place to organize and store completed stories for quick retrieval, then Archive can be viewed as a story’s home for long-term storage.
Archive makes use of the File Log system and even shares some of its commands. When you open Archive (F6 from the keyboard or toolbar), you’ll immediately see the Select Custom Folder box we discussed in the File Log section. It is recommended that your systems adminstrator create at least one main "Archive" folder. Depending on your organization and storage needs, several levels of subfolders (1999, Sports, or any subcategories you wish) that open from your main Archive folder can also be created.
You may notice right away that Archive functions nearly identically to the File Log. A critical difference is the overwrite safety feature we’ve built in to the Archive feature. If you work on a story has the same file name as one that has already been saved to a particular custom folder, upon saving it again you will be asked if you wish to overwrite or replace the previous story. This prevents the confusion that can arise from having several files with the same name.
But in Archive – an area to which all users have simultaneous access – files with identical names are not overwritten. They instead retain their names and are differentiated by a timestamp and writer name that are added automatically. This important feature prevents multiple users from erasing each others’ stories.
You can save to Archive from the File Log or Notepad. To save multiple stories from the File Log to Archive, select each desired headline by single clicking it while holding down the CONTROL key. With the keyboard, hold down the CONTROL key as you scroll with the ARROW keys, then hit the SPACEBAR to select a headline/story. (There is no limit to the number of selections you can make.)
Now select F6 from the keyboard or toolbar. Double-click the custom folder you want to send the stories to. With the keyboard, use the ARROW keys to highlight the desired custom folder and hit ENTER.
You will notice that the Select Custom Folder box has disappeared, but your stories remain highlighted. This makes it easy to delete – all at once – those stories that have now been safely archived.
Planner
One of the most convenient features of NewsReady32 is the Planner, which functions as both a system-wide and personal organizer/calendar.
The Planner allows you to
All users (when NewsReady32 is purchased and registered for group deployment) can access public information such as future stories, schedules and assignments, but at the same time, the Personal option lets individual users organize and plan their own activities. A user can view only that Personal Planner associated with his or her log-in and password.
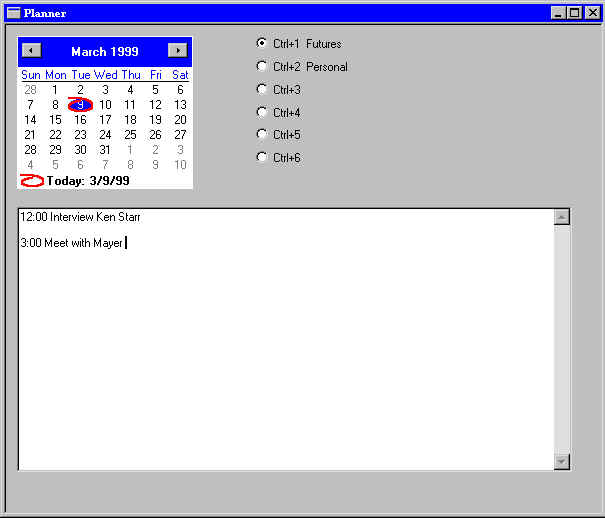
To open the Planner, double-click the Planner button on the toolbar, or hold down the ALT key and hit 7. You’ll see a calendar and a set of radio buttons. Below is an editor into which you can type or paste text.
Two arrow buttons above the calendar let you move ahead or back. You can always return to the current date quickly and easily by clicking Today at the bottom of the calendar. To store a story for future use, check the Futures radio button. Now click the desired date on the calendar, then type or paste your story into the text window/editor. Click Today. The text you entered is gone, but clicking the date again returns it to the text window.
Use this same procedure to enter personal information, schedules, assignments, and so on. Just be sure to check the correct radio button. NOTE: Only Futures and Personal are preset. While Schedules, Assignments, Meetings, and Events are popular headings, your systems administrator can customize these four categories.
Using the Audio Player The AudioPlayer is a built-in cart deck that allows you to play back audio files while reading your newscasts. For every audio card installed in your computer you will have an available cart deck. Basic configuration options of the cart deck
Using the Wave Decks tab, you can assign audio boards to the cart decks. This applies if you have more than one audio card installed in your computer. If you have only one audio card installed, these should all be assigned to Audio Board 1.
OnAir Mode vs. Audition Mode The Audio Player offers two modes of operation: OnAir and Audition mode. The difference concerns whether the logging capability is enabled. When in OnAir Mode, a log containing a record of every WAV file played from the Audio Player is created in the [networkdrive]:\WIREACONFIRM directory. Switching Between Modes. Click Setup at the top of the screen. Next, click on OnAir Mode. When OnAir mode is active, this will be checked.
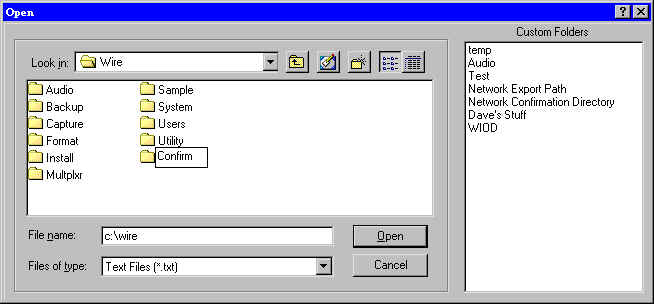
Setting up the Logging Capability Begin by creating a directory called CONFIRM in which the logs will be stored. This directory must exist in order for logging to work correctly. Once the logging is enabled you can view and print these logs from Notepad.
This will open a window displaying various folders. Select the user's folder (double-click the WIRE folder). Then click the button that contains the folder with a star-like object (to the left of the button containing the folder with the arrow pointing up). This will create a new folder. Type CONFIRM and press ENTER.
Now you can view and print these logs from Notepad:
The logs will be called mm-dd-yy.log, and will display the name and time stamp of the audio file.
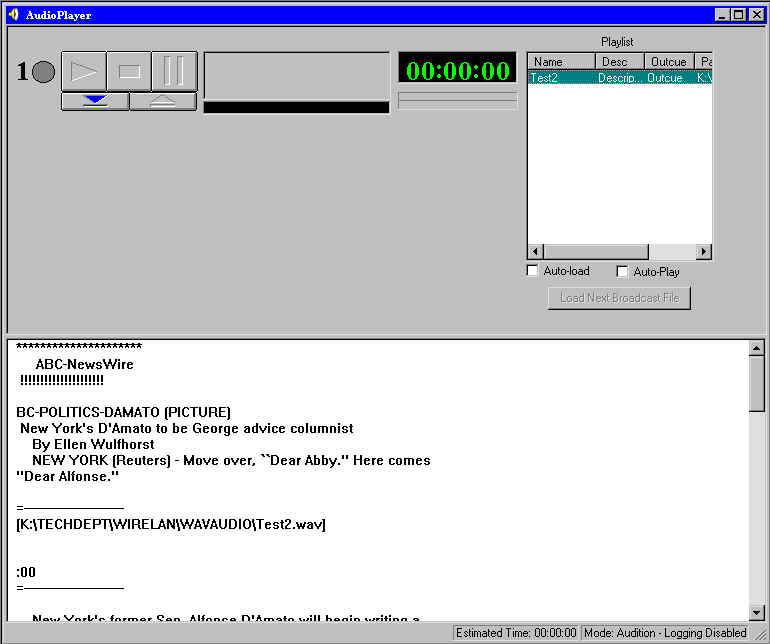
Loading the Newscast into Audio Player We will now take the newscast (broadcast file and newscast are the same in this example) and load it into the audio player.
You will notice that the actual text of the broadcast file is located at the bottom of the Audio Player window. The audio files that were inserted into the broadcast file are now listed in the window to the right of the audio deck. You'll also notice that the audio files are loaded in the order in which they were embedded into your newscast. These audio files are also tagged with audio file name (in brackets), outcue text (if any) and description (if any).
NOTE: If you already have a broadcast file loaded and you load a second one, the decks will be reset and loaded with the new audio files.
Positioning the Scroll Bar Within the Audio Player window is a horizontal gray bar which can be positioned to show as much or as little of your newscast as you wish. To adjust the bar: Place your mouse cursor on the gray bar. It will turn into a two-headed pointer (up and down arrowheads). Hold down the left mouse button and move the bar up and down. Release the button when the bar is in the desired position.
Auto-Load vs. Manual Load One of the features of the Audio Player is its ability to automatically load the next audio file from your newscast as you play the audio files. After an audio file as finished playing, it will be automatically ejected the next audio file on the list will be loaded immediately. So as you scroll and read your newscast from the lower half of the audio player, you can play each cart in the order they’re called for in your newscast.
If you have more than one cart deck available. When the Auto-Load feature is enabled, the first deck loads the first audio file in the list, the second cart deck loads the second audio file from the list, and so on.
Disabling Auto-Load. There may be times when you prefer to manually load different files (described in detail in later sections) to preview them before playing them over the air. To enable/disable Auto-Load: Just below the window that lists your audio files is an option box labeled Auto-Load. When the Auto-Load feature is enabled, this box will be checked. Simply click the box to activate or deactivate Auto-Load.
To manually and selectively load carts from your list:
Loading Audio Files Directly You can also load audio files from a directory, as opposed to having to load a broadcast file. This gives you the option of playing audio files on the air without a broadcast file present.
Loading audio files in this manner allows you to still use the audio-load feature described in the previous section.
Putting it All Together / Reading your Newscast (Single Audio Deck) Now that we have shown you the features of the audio player, let's review how to set up and read newscasts on the air. (This assumes you already have a newscast written, complete with embedded audio.)
Once you have Auto-Load selected, you will notice that the first cart of your newscast is already loaded in your audio deck. To play the cart, click the green Play button. Once a cart is playing, the deck will turn green and the timers will begin to move. To stop the cart, click the red Stop button. To pause, click the blue Pause button. You can also play the audio files by pressing the F11 key. It will play the next-up deck, which has a yellow dot to the left of it. Once an audio file has finished playing, it will automatically eject. The next audio file from your newscast will then load itself and be ready to play. You can also scroll and read your newscast, then play the audio files at the appropriate times.
Putting it All Together / Reading your Newscast (Multiple Audio Decks) As noted, there will be one audio deck for every audio card you have installed in your computer, with a maximum of three. Reading a newscast and playing your audio files works the same with multiple audio cards with a few minor differences. When you load audio files ( from either a broadcast file or directory) and the Auto-Log feature is enabled, each of the audio decks will be loaded with an audio file from that broadcast file or directory. The first deck will load the first audio file, the second deck will load the second audio file, and so on (depending on the number of audio cards installed). For example, say you have three audio decks, and you load a broadcast file. The first three audio files from your broadcast file will load into the three audio decks, respectively. As you are reading through your newscast and you play your first audio file from deck #1 , the audio file will eject and the fourth audio file from your broadcast file will load. After you play the second audio deck, it will eject and then load the fifth audio file from your newscast/directory, and so on.
Resetting your Broadcast You can reset your broadcast at any time. This ejects all audio decks and reloads with the appropriate audio files. To do this:
Using the Audio Log The Audio Log lets you view your WAV audio files in a particular directory. You can also change the name of the audio file and add or edit a description. With the Audio Log, you can add or edit other fields such as outcue/intro text, category (such as sports, news, etc.), status (such as needs to be edited, ready for air, etc.) and the initials of the person who created the file. You can also preview the audio file with a single click of a button.
Selecting a List of Audio Files Begin by selecting a directory or list of files to work on:
Editing the audio of an audio file Once you have your list of audio files in the Audio Log window, you can then edit the audio of any of them with Cool Edit96, NewsReady32’s built-in audio editor. The first step is to tell Windows95 that Cool Edit96 is the default audio editor. (NOTE: If you do not wish to make Cool Edit96 your default audio player/editor, then do not follow these steps.)
In the list of file types, find the audio. This should be listed as WA V Sound. The
settings for that file type are shown in the File Type Details box. Make sure the
extension is WAV.
Once you’ve set Cool Edit96 as your default audio editor, double-click the audio file name you wish to edit. This will automatically open Cool Edit96 and with the selected audio file. The audio file you selected will also play once. You can then switch between programs by either clicking the appropriate window the respective buttons on the task bar, which is located at the bottom of your screen. Editing the information on an audio file
Once you have a listing of audio files in your Audio Log window, you can edit the information (name, description, category, status, etc.) with the click of a button.
While in the Edit Info window you can also listen to the audio file by clicking the Preview button.
Deleting an Audio File To permanently delete the audio file from your system:
Refreshing your audio file list If your audio log is open and you (or someone else) saves an audio file to the directory that’s being listed in your audio log, hitting the refresh button will then display the new audio file. Simply click the Refresh button in Audio Log.
Sorting the Audio Log You can sort audio files by any of the columns in the Audio Log by clicking the column heading.
Embedding audio files into Notepad: another way The Embed button in the Audio Log allows you to embed audio files directly from your Audio Log.
This will embed the audio file name, description, length of audio file and outcue text. Follow these steps for every audio file you wish to embed. If you have two or more Notepads open, you will be asked to choose which to embed the audio file into. Click the Notepad you wish to use.
|